Monday, December 15, 2014

TEN USEFUL ANDROID TIPS AND TRICK


Whether you are a newbie for android and eager to try out every available option you see on the screen, or familiar with the system, including the annoyances that plague you on a daily basis, tips and tricks to get around a system is always helpful. I am here to help you with that.


In this post, I will be featuring 10 Awesome and use android tips and trick that may improve your experience while using your Android device. Do note that the steps may vary a little from one Android phone to another due to the differences in the build and the OS version and also sometimes from mobile-to-mobile, but if you play around with it, the next step isn't too far off.

Tuesday, November 25, 2014

Learn How To Activate Your Verve Cards For Online Transactions at Nigeria ATMs


The Verve Card is the new Interswitch Debit Card now with the Chip and PIN. Verve is the new name of the more secure and convenient Interswitch card with which  the introduction of chip and PIN makes transactions safer and with Quickteller services, adds convenience to everyday life. Verve is issued by Nigeria Banks and powered by Interswitch. The Verve is simply the new name of the
InterSwitch ATM card. The different types of Verve cards includes: Verve Debit, Verve PrePaid and Master Card Verve. The Verve Debit Card is the one linked to your savings or current account by your bank.

You can use your Verve card on all channels (ATMs, mobile, POS, Web, and Kiosk) and locations with logos bearing: Verve, InterSwitch, Quickteller, Reward. I use my Verve debit cards a lot to pay for online transactions as well as transfer money to other bank accounts via the Quickteller app. You can also use it to withdraw cash, pay bills and purchase airtime at ATMs.
Nigerian Banks that currently issue Verve cards are listed below:

Wednesday, November 19, 2014

How To Enable Hibernate Option in Windows 8


To enable hibernate option in windows, click on the battery icon in the system tray and click More Power
Options:


Now from the left panel, click on “Choose what the power buttons do”

HOW TO DOWNLOAD TORRENT FILE USING INTERNET DOWNLOAD MANAGER


Follow these steps and you shouldn't have any problem

STEP 1== download torrent file from any website e.g thepiratebay.org,kickass.to, extratorrent.cc etc

STEP 2== go to torrent2ddl.com and click upload .torrent and request for a direct download link to your email

Friday, November 14, 2014

DIFFERENCES BETWEEN GPRS, EDGE, 3G, HSDPA, HSPA+ AND 4G


While discussing with a friend of my i was asked the differences between GPRS, EDGE and 3G, so i decided to share this knowledge today because i realize that there are people out there that don't know anything about Wireless Network .

Before advancing, it should be known that 1G, 2G, 3G, 4G etc refers to the different generations of wireless communication technology characterized by having a defined range of speed.


GPRS(General Packet Radio Service)
GPRS is a packet-based wireless communication service. It is a 2G technology network that support a download speed of up to 114Kbps. Limitation of GPRS is that GPRS data cannot be sent while a voice call is in progress.

Thursday, July 3, 2014

IPHONE PART 2 - NO SERVICE


i have discuss the part 1 of IPHONE on how to Unlocking your iPhone 3G. Here is the Part 2 for those that have unlocked their iPhone 3G and still see "No Service".
There is an easy way to remove the "No Service" iPhone 3G error and I can show you how to get rid of it in just a few easy steps.

Sunday, June 29, 2014

IPHONE Part 1 - HOW TO UNLOCK PASSCODE


IPHONE 3Gs RESET AND RESTORE:
1. Disconnect the USB cable from the iPhone, leave the other end connected to your Mac/PC
2. Launch iTunes
3. Press and hold the Home and Power button on the top of the iPhone to turn off the device
4. Press and continue to hold the Home button while you reconnect the USB cable to your iPhone, this will cause the iPhone to turn on

Friday, June 27, 2014

NOKIA SECRET CODE

Here are some list of nokia code you can used on phone

Nokia Code function
*3370# This Nokia code activates Enhanced Full Rate Codec (EFR) - Your Nokia cell phone uses the best sound quality but talk time is reduced my approx. 5%
#3370# Deactivate Enhanced Full Rate Codec (EFR)
*#4720# Activate Half Rate Codec - Your phone uses a lower quality sound but you should gain approx 30% more Talk Time
*#4720# With this Nokia code you can deactivate the Half Rate Codec
*#0000# Displays your phones software version, 1st Line: Software Version, 2nd Line: Software Release Date, 3rd Line: Compression Type
*#9999# Phones software version if *#0000# does not work
*#06# For checking the International Mobile Equipment Identity (IMEI Number)

Tuesday, June 24, 2014

SAMSUNG SECRET CODES


*#1111# S/W Version
*#1234# Firmware Version
*#2222# H/W Version
*#8999*8376263# All Versions Together
*#8999*8378# Test Menu
*#4777*8665# GPSR Tool
*#8999*523# LCD Brightness
*#8999*377# Error Menu
*#8999*327# EEP Menu
*#8999*3825523# Don't Know.
*#8999*667# Debug Mode
*#92782# Phone Model (Wap)
#*5737425# JAVA Mode

Monday, June 23, 2014

HOW TO OPEN PAYPAL ACCOUNT IN NIGERIA


What is PayPal?
PayPal is a form of internet banking or an international e-commerce business, that allows payment and money transfers to be easily made through the internet. In other words, with PayPal service, you can pay, easily send money (Both foreign and local transfer), and accept payments without exposing your financial details. It's also known as the most secured internet banking business that enables you pay with flexibility (through the use of debits and credits card), and it's transaction means is the fastest.
Lately, there was a controversy about the restriction of the Nigerians from using PayPal. Most Nigerians (Especially tech bloggers) did signed a petition against that controversy at this page, and now, we are happy to inform you guys that the PayPal internet banking is now available in Nigeria.

Thursday, May 29, 2014

10 MOUSE TRICK YOU HAVE NEVER TRIED


The Mouse as an input device was one of the coolest inventions in the history of computers. It makes GUI so easy to handle that most of us prefer to use it over keyboard. But then, how many of us really use the mouse to its fullest extent?
Whenever we feel that we need to click, we press the mouse button (a true replacement of the Enter key). Actually, we use the mouse to perform very little and I say so because we do not know the inner potential and are unaware of many tricks associated with it. However, there are few on top of my head right now that I would like share with our readers.

1. Holding Shift key to Select Text

Most of know that we can select contiguous files and folders by holding the Shift key and clicking on the first and then the last file/folder. This also applies to selecting text on documents like MS Word, Notepad or any other text editor.
All you need to do is click on the first character, then press the shift, point to the last character, click there and release the Shift key.

2. Holding Ctrl key to Select Multiple Text

Have you ever wanted to select multiple pieces of text on a document? What do you do then? Here’s the answer. Keep the Ctrl key held while selecting text. Again, keeping it pressed, select another piece of text; select the third piece of text and so on.

3. Holding Shift Shows Extended Context Menu

All files and folders are bestowed with a right-click context menu which allows us to perform certain action on the files/folders. Did you know that there are some hidden options in it?
If you press the Shift key while doing a right-click you will be presented with an extended menu with those hidden options.

4. Zoom In and Zoom Out

All applications- image viewers, document editors, browsers and even the explorer allow you to zoom in and zoom out. While most of them have keyboard shortcuts or a dedicated tool to support that, some have none.
You can use the mouse scroll to for all zooming activities along with the Ctrl key kept pressed. Never tried? Try it right now!

5. Window Tips with Mouse

Many people double click on the center of the title bar in order to maximize the said window. Give it a try if you were unaware of it.
But the smarter trick is in closing a window by double clicking on the left end of the window title bar.

6. Hold Ctrl to Open a Link in New Tab

Whenever we click on links, some open in the same tab, some open on a new tab and others open in a new window. We can always right-click on the link and select our desired behavior.
If your regular choice is Open in New Tab you can emulate the same behavior by holding the Ctrl key and clicking on the link.

7. Closing Browser Tabs

Left button of the mouse is not working? And if you do not know the keyboard shortcut to close a browser tab, what are you going to do?
Simply press the mouse scroll by pointing on the middle of a tab and see what happens.

8. Activate Mouse ClickLock

This feature relieves you from keeping the mouse button pressed for performing activities like text selection and moving files of folders. It can be really useful for laptop users when their touchpad is not functioning.
Learn more on how to fix mouse drag issues by activating ClickLock.

9. Want More Drag Drop Options?

All of us are accustomed to the drag and drop activity of the mouse. But have you ever tried doing the same with the mouse right key?
You will see added options to Move Here, Copy Here and Create shortcuts here.

10. Hold Alt to Select Columnar Text

Have you ever felt the need to select text vertically on a Word document? And did you end up doing that one by one, wasting lot of time?
There is a better way in combination with the Alt key

if you like this post please leave a comment or if you known more trick kindly share it by commenting
Thanks

Also check: HOW TO CHANGE FOLDER BACKGROUND ON PC
                    REASON WHY PC/LAPTOPS CRASH
                    

Friday, May 9, 2014

REASONS WHY PC AND LAPTOPS CRASH


10 reasons why PC and Laptops crash you must Know


Fatal error: the system has become unstable or is busy," it says. "Enter to return to Windows or press
Control-Alt-Delete to restart your computer. If you do this you will lose any unsaved information in all open applications."

You have just been struck by the Blue Screen of Death. What can you do? More importantly, how can you prevent it happening?

1 Hardware conflict

The number one reason why Windows crashes is hardware conflict. Each hardware device communicates to other devices through an interrupt request channel (IRQ). These are supposed to be unique for each device.

For example, a printer usually connects internally on IRQ 7. The keyboard usually uses IRQ 1 and the floppy disk drive IRQ 6. Each device will try to hog a single IRQ for itself.

Tuesday, May 6, 2014

HOW TO FACTORY RESET A LAPTOP WITH A RECOVERY PARTITION


Restore your laptop back to its original settings​

Restore your laptop to factory settings, If you need to give your laptop fresh start, we’ll tell you how to factory reset a laptop.
Restoring your laptop to the state it came out of the factory can be handy for a number of different reasons. Perhaps you’re having problems with your laptop’s performance, a virus or you simply want to sell it on and remove all your programs, files, passwords and other sensitive information. In these situations, a recovery partition is your friend.
It’s a little more difficult than a smartphone or a tablet but we’ll show you how to do it step by step.

Most laptops don’t come with recovery discs any more but if yours does then this is still a fairly easy way of performing a factory reset. If you didn’t get any discs in the box, then there’s a good chance your laptop has a recovery partition.

Saturday, May 3, 2014

How to Recover Hidden Files from Flash Drives or External Hard Disks Due to Virus Infection


If the files and folders in your external hard disk or flash drive have turned into shortcuts or are hidden, here is one solution to recover your data. Operating system used – Windows 7.

Install good antivirus and scan entire computer including the flash drive/external hard disk.
Go to Control Panel, Folder Options, select VIEW tab, select ”Show hidden files, folders and drives” and uncheck ”Hide protected operating system files (recommended)” now click APPLY


Folder Options

Friday, May 2, 2014

COMPRESS LARGE FILES INTO SMALLEST FILE SIZE USING WINRAR

How to compress large files into smallest file size using winrar

WinRar have a special function where you can compress any files into a really
small size file. For example a 3.4GB file can be compress into 10mb or less. 
Cool isn't it?

To do it, just follow my simple steps below :
1. Right Click or highlight any file that you want to compress.

COMPRESS 100MB VIDEO TO 20MB USING HANDBRAKE


HandBrake
The open source video transcoder


Features
Built-in Device Presets
Get started with HandBrake in seconds by choosing a profile optimised for your device, or choose a universal profile for standard or high quality conversions. Simple, easy, fast. For those that want more choice, tweak many basic and advanced options to improve your encodes.


Supported Input Sources:
Handbrake can process most common multimedia files and any DVD or BluRay sources that do not contain any kind of copy protection.

Outputs:
File Containers: .mρ4(.M4V) and .MKV
Video Encoders: H.264(x264), MPEG-4 and MPEG-2 (libav), and Theora(libtheora)
Audio Encoders: AAC, CoreAudio AAC/HE-AAC (OS X Only), mρ3, Flac, AC3, or Vorbis
Audio Pass-thru: AC-3, DTS, DTS-HD, AAC and mρ3 tracks


Even more features
Title/Chapter selection, Queue up multiple encodes, Chapter Markers, Subtitles (VobSub, Closed Captions CEA-608, SSA, SRT), Constant Quality or Average Bitrate Video Encoding, Support for VFR, CFR and VFR

Video Filters: Deinterlacing, Decomb, Detelecine, Deblock, Grayscale, Cropping and scaling, Live Video Preview


dØwnlØad it here

please take note before you can download the file you will pass through adfly just skip if you get there


Monday, April 7, 2014

How to Format Your s60v3 Phone


Try it, its simple!

First, switch off your phone, & make sure it is fully charged.

second, Hold the following 3 keys, (on non touch-screen phones only)

--the calling key (green key)
--the * key (star key)
--the 3 key (number 3)
Then switch ON your phone while you still hold the keys..

Un-hold when the nokia logo appears!

WAEC GCE 2013 [Nov/Dec] IS RESULT IS OUT


WAEC GCE 2013 Nov/Dec result is now online, and open for checking!

We have provided necessary
steps for checking the 2013 Nov/Dec WAEC GCE results below.

Step1:
Identifying yourself by Supply your 10-digit WAEC Examination Number. (ie. your 7-Digit centre number
followed by your 3-digit candidate seat number eg. 4123456789).

Step2:
Specify the year you wrote the WAEC examination.

Step3:
Select the type of examination you sat for For the recently released result, select Nov/Dec WASSCE(private).

Step4:
Enter the Card Serial Number found on the reverse
side of your Scratch card.

Step5:
Enter the Personal Identification Number (PIN) on your Scratch card

Step6:
Click "Submit" and wait for your result window to come up, then print.

How to check your WAEC Result Using SMS

YES! You can check your WAEC result via SMS. To check your WAEC GCE 2013 result with a mobile phone, you will need to buy the WAEC Direct Scratch card and simply send a short code in this format: WAEC*ExamNo*PIN*ExamYear to 32327. For example, if your WAEC Examination number is 42966731, your PIN is 123456,and you sat for WAEC 2013 May/June, send WAEC*42966731*123456*2013 to 32327.

The WAEC SMS result checking service costs N30 per SMS and is available only on Glo, Airtel, and MTN networks.
Sending your WAEC result to your email With the result checker function at the WAEC Direct website, you can send a copy of your WAEC result to your email address.

This will make it easily accessible when ever you need it. This is because you have only 5 access to your WAEC result per scratch card. Sending a copy to your email means you can access it as many times as you want via your email.

To send your WAEC result to your email, select the Send results to Email option on WAEC result checker, after you have logged in and enter your email address and click submit.

A copy of your WAEC result will be sent to your email address.

See website for checking: http://www.waecdirect.org


Saturday, April 5, 2014

Tricks and Tips for Mozilla Firefox


1. One-Click Bookmarking



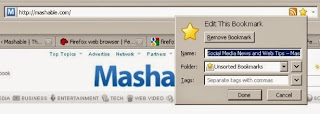
Firefox offers a very fast way to add a site to your bookmarks — simply click on the star icon in the browser's "Location Bar."

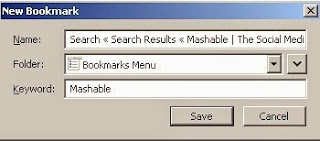
Clicking once will add the page to your "Unsorted Bookmarks" folder while clicking twice will open up a window that will allow you to edit where the bookmark should be saved, its title, and any tags (see #2 below).


2. Tag Your Bookmarks for Quick Access
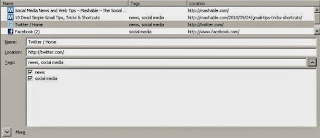

One way of organizing your bookmarks in Firefox is to tag them with keywords. You can either do this as you save them down, or retrospectively by going to the "Bookmarks" menu, selecting "Organize bookmarks," finding the bookmark you want to tag, and adding in the keywords.

Once you've added a word, such as "news" as you can see in the example above, Firefox will offer this as a tag option in future, meaning you just have to tick the box to add it as a tag to another site.

Once you've set up your tags, typing a tag into the Location Bar will bring up all the sites you've tagged with that word, offering quick access to sites you visit often.


3. Shrink Your Icons
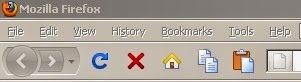


You can change how Firefox's toolbar icons are displayed to give you a little more screen space. This is useful when every pixel counts (as on a netbook screen), or simply to achieve a more minimalist look.

Simply go to the "View" menu, select "Toolbars," hit the "Customize" option and then tick the "Use Small Icons" box.
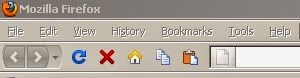
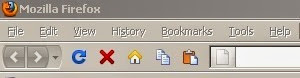

If you want to lose the icons altogether, you can follow the same steps, but hit the drop-down menu next to "Use Small Icons" and select "Text" for a graphics-free toolbar.
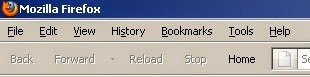


4. Add Icons to the Toolbar



If you carry out the same actions often, such as printing, viewing your history, or managing downloads, there's a way to add more functionality to your toolbar.

Go to the "View" menu, then "Toolbars," then the "Customize" option, and you can drag and drop a number of extra icons to the top of your browser for easy access.

5. Change the Default E-mail Setting
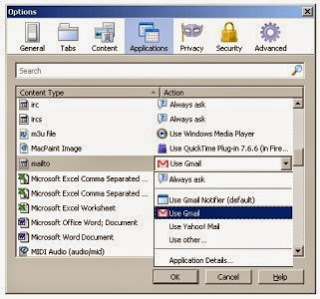


When you click on "Send Link" or "mailto:" links in Firefox, the browser will load up your operating system's default e-mail program (so likely Outlook in Windows or Mail on a Mac). But it's quite often the case that these aren't the mail programs you want.

You can stop the annoyance of Firefox loading up a default mail program by changing your preference in settings, and it's really easy if you use Gmail or Yahoo Mail.

Go to "Tools," "Options," "Applications" and scroll down until you see "Mailto" on the left. Now, just hit the drop-down menu and select the e-mail program you'd like to use in the future. The next time you click on a mail link in a webpage, it will load up your preferred e-mail program.

6. Save a Search Shortcut
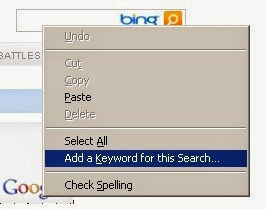


You can save time on sites you search regularly so that you can quickly start a search process on that site from anywhere on the web. To get this set up, right-click on the site's search box and select "Add a Keyword for this Search."

Once you assign a keyword to a site search, you can simply type "keyword + search term" in your Location Bar to search that website. So, for example, typing "Mashable + Social Good" will search Mashable.com for that content, once the keyword is set up. This will save you the extra steps of loading the site, finding the search box and entering the term.


7. Change the Default Font Size
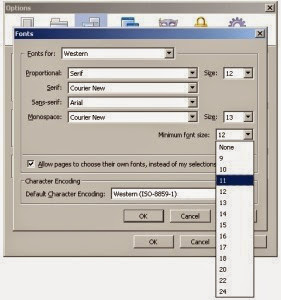


You can ensure you're never left squinting at tiny text on your monitor with an option that forces sites to display text at a minimum font size.

Although it should be noted that this may cause some sites to display erroneously, if textual clarity is more important to you than web design purity, go ahead and make the changes — your optician may thank you for it!

Go to "Tools," "Options," then "Content" and then click on the "Advanced" button next to "Fonts & Colors." You can then select a minimum font size from the drop down menu. Rest easy knowing that you'll never be presented with a sea of 6 pt. text again.

8. Learn Some Shortcut Keys



There is a whole load of mouse and keyboard shortcuts in Firefox, but we've highlighted the ones we find most useful:

Control + Enter — adds .com to the end of text in the Location Bar
Control + Shift + T — reopens the last tab you closed
Alt + D — highlights the text in the Location Bar
Control + Page Up/Down — Moves to previous or next tab
/ — Quick find

9. Set Up Multiple Homepages
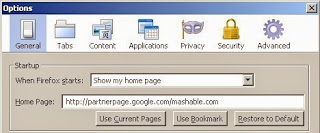


It's true, you can have more than one website as a homepage. You can configure Firefox to load your webmail, favorite news site and social network of choice as it starts.

To set this up, simply load up the sites you want as your homepages, go to "Options," then "General," and then hit the "Use Current Pages" button.

Now, the next time you start Firefox, you'll be productive from the get-go.

10. Clear a Single Site From Your History
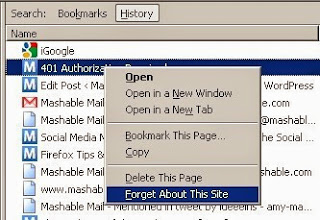


We've all done it — typed "Facbook" instead of Facebook And now the browser loads up the wrong site every time. However, this need not be the case, as Firefox offers a clever way to delete one site from your browsing history rather than forcing you to clear all your recent activity.

To tidy up any types in your web tracks, go to the "History" menu, click on "Show All History," and then type the name of the site you want to get rid of in the "Search History" box. When it has loaded, simply right-click on the site and select "Forget About This Site." Now it's no longer history — it's ancient history.


HTTP Pipelining - Firefox Browser


HTTP Pipelining

Hypertext Transfer Protocol or HTTP is a request/response protocol used to transfer or convey information between clients and servers. In simple words, the client makes an HTTP request and the responding server (Origin Server) which stores the resources or information will respond to it. HTTP Pipelining is a technique in which multiple requests will be send out without waiting for the corresponding responses. By customizing the HTTP Pipelining in Firefox, it helps to speed up the browsing capability. The customizing process can be done step by step as follows:

Run your Firefox. Type in “about:config” into the address bar and press Enter. Scroll down the page and look for “network.http.pipelining“, “network.http.proxy.pipelining” and “network.http.pipelining.maxrequests“. You can also use the filter bar to search for these three entries.


Double click “network.http.pipelining” and “network.http.proxy.pipelining”. The “False” value will automatically change to “True” Value.


Double click “network.http.pipelining.maxrequests”, change the integer value in the pop-up window to 30. By entering 30, this means it will make 30 requests at once to the responding server.


Finally, just select any of the browsers and do a right-click. Select “New” followed by “Integer”. There is a small pop-up box which requires you to enter the preference name. Just type in “nglayout.initialpaint.delay” and set its value to “0″ in a subsequent pop-up box. This signifies to the browser to act immediately on the information it receives without waiting for any lapse of time.


Your Firefox browser will be much faster

Wednesday, March 12, 2014

UNIBEN 2013/2014 Online Clearance Exercise For UTME & Direct Entry Candidates


1.The UTME and Direct Entry Candidates admitted into University of Benin for 2013/2014 academic session are required to login at http://www.uniben.edu, click Waeup Portal with the PUTME/PUDE username and password used for their application and result checking.

2. Click on “Download application slip”. Print it and take note of your ID and Password. You will henceforth, use your ID and Password for subsequent login. Login and print your provisional admission letter.

3. ONLY CANDIDATES WITH THE RIGHT PASSPORT SIZE (1-inch X 1-inch) PHOTOGRAPH USED FOR PUTME & PUDE ALREADY EMBEDDED IN THEIR DOCUMENTS WITH REQUISITE RESULTS TO CLEAR SHOULD PROCEED TO PAY THE TOTAL AMOUNT OF NON-REFUNDABLE ACCEPTANCE FEE ITEMIZED BELOW.

College of Medical Sciences Candidates Other Candidates
N N
Bank/Portal charges - 3000.00 3000.00
Admission clearance - 20000.00 20000.00
ICT Levy - 6000.00 6000.00
Development Levy - 15000.00 15000.00
MTN NET Library - 1000.00 1000.00
College Development fee - 20000.00
-----------------------------------------------------------------------------------------------------------------------
TOTAL : 65000.00 45000.00


Schools/Departments under College of Medical Sciences:

Medicine
Dentistry
Anatomy
Medical Biochemistry
Medical Laboratory Science
Nursing Science
Physiology


4. Optional: You can change your password by clicking “change password” button and you can also change your e-mail and phone number by using “Edit” button.

5. On the Menu, click on “My data” select “Payment” option then click on “Add online payment ticket” button.

6. Select from the Payment Category, Acceptance Fee and click on “Create Ticket” button and then click the link under Payment ID.

7. Click on the “College Pay” button to view payment details and click the “Submit” button to proceed with the payment through Interswitch payment gateway.

8. Select your ATM Card type: Verve or Master Card and supply the card details (card number, expiration date, 4-digit PIN etc) as required.

9. Then click on “PAY” button.

10. If payment is successful, an acceptance slip will appear on the screen. Copy the “Clearance Activation Code” on the acceptance payment slip.

11. Click on “My Data” on the menu and select “Clearance data” option. Enter your “Clearance Activation Code” to open your Clearance/Eligibility form.

12. Fill the Clearance/Eligibility Form appropriately. Scan and upload the following documents:

a. Certificates/ Statements of result
b. Birth Certificate/Declaration of Age
c. Acceptance Letter
d. Guarantor’s Letter
e. Affidavit of Good Conduct
f. Affidavit of Non-Membership of Secret Cults
g. JAMB & UNIBEN offer of Provisional Admission slips

(Please note that affidavits sworn in any Court of Law in Nigeria are acceptable)

Payment of acceptance fee commences Monday 3rd March, 2014

13. At the bottom of the Clearance/Eligibility Form, click on the “Save” button to return later and complete the form OR click on “Save and request clearance” button to finally submit your Clearance/Eligibility Form when you are done. You cannot edit the Clearance /Eligibility Form after final submission.

14. Click on “Download clearance slip” button and print your Clearance/Eligibility slip. Present it with online payment receipt, six (6) copies each of the listed items a to g in item 12, including six coloured passport photographs with red background and WAEC/NECO Scratch Card for checking results online to the clearance officers. The original credentials are for sighting during the physical clearance.

15. Physical clearance commences Monday 24th March to Friday 25th April, 2014 at the University Auditorium Monday to Friday from 9.00am to 5pm each day.

16. Limited accommodations are available for Fresh candidates.

17. Prohibition of Financial Transactions at Clearance Venue: There shall be no financial transactions in whatever form at the Main Auditorium Clearance Venue. Consequently, sales of Faculty Prospectus, Collection of dues, levies and other forms of Payment and Purchases are strictly prohibited. The release of completed and signed Clearance/eligibility form to student should not be tied to any other payment other than the fund paid for clearance.

Friday, February 14, 2014

How to Revive your Dead Laptop Battery


1. Take out the battery from your laptop.

2. Wrap the battery in a towel and put it in a plastic bag [waterproof]; be sure to seal it properly.

3. Put the sealed battery in a freezer for a minimum of 12 hours – no need to worry, it can even stay in the freezer up to 72 hours.

4. Take out the battery from your freezer. Do not hasten to unpack it from the plastic bag, just allow it to sit for another 10 hours until it reaches room temperature. Afterwards, if the package is still cool to touch, allow it to sit a little longer.

5. As soon as it hits room temperature, remove the battery from the plastic bag, unwrap the towel and wipe off any moisture with a dry towel.

6. Put back the battery in the laptop but DO NOT POWER ON. Rather, plug the PC into your AC charger and charge until fully charged.

7. Disconnect the charger, VOILA! Your battery is now revived.

Although it’s actually not brand-new, but you’ve succeeded in reviving 90% of the energy it had. NEXT inspect your laptops power settings and disable items such as screen saver, sleep mode and monitor brightness. Be sure to use up the battery till its 3%. Afterwards, plug the PC (with battery attached)into your AC charger. let it charge all night if possible. After that, consume every last drop of the battery energy – at least allow 3% remaining.

Allow it sit another 8hours. After doing this you’ll notice a dramatic increase in battery life. But let me emphasize this fact one more time: this process can never make your battery to be as good as new. That’s because eventually, as your battery ages, the chemicals in it undergo dramatic changes that make it lose its verve. It cannot be magically reload.

don't forget to drop your comments if you like this article

Tuesday, February 11, 2014

Easy way to take SCREEN SHOT ON ANDRIOD PHONE


Whether you’re a blogger taking a screenshot of Android apps or just someone that wants to show off their Android setup to your friends, the process of showing those snapshots can be stressful. While Android 4.0 offers a built-in way to take a good screenshot, that’s little consolation if you’re still using an older version of the Android operating system.
No matter what device you have, you can take a screen image without rooting your device. But rooting your device offers you some neat tricks — even if you’re using Android 4.0. You can take a screenshot by shaking your device or wirelessly via a web browser.

Take a Screenshot with Android 4.0
If you’re using Android 4.0 or later, this is easy. Just press and hold the Volume Down and Power buttons at the same time. You’ll see an animation on the screen, indicating that the screen photo was saved. Android will save the image to your Gallery. Launch the Gallery app and tap Screenshots to view and share your screenshot.

Android SDK
Is Taking A Screenshot On Android Really That Hard?
As an online writer for technology, I found this lacking feature disheartening. And it is possible to run apps that take screenshots on your Android, but you need root access – and for most manufacturers if you do that, you could void your warranty. Also, blocking your apps from root access is one reason Linux users are so proud of their operating systems – they are virtually immune from all viruses. When all other mobile devices get attacked – you’ll be standing strong.
However, despite this drawback, I also discovered that taking a screenshot of the Android screen isn’t really that difficult using a PC or laptop. And in this article I’m going to show you how to connect your Android device to your PC via USB and quickly capture a screenshot whenever you like. The first step of course is to make sure your PC is configured to quickly connect to your Android phone. To do this, you just need to set up the following applications once on your computer.

1.  Install the USB driver for your phone onto your PC. You can get the Android driver for Windows
     PCs here.
2. The Java SE developers kit.
3. The Android SDK developers kit
note: before you can download check the top right corner of your web browser and click skip advert after you have click on the link

Download and install those three applications, and you’re already halfway to taking screenshots with your Android quickly and easily. After you set up the Android SDK developer kit, you’ll be presented with an update screen that probably has an error saying you need to force download. Just cancel/close that screen and continue to the procedure below.

Setting Up Your PC To Take Android Screenshots (Only Have to Set Up Once)
Keep this in mind – once you go through the following procedure just once, you’ll be set up to instantly take screenshots on your Android with your PC whenever you like. Remember, you don’t have to do this every single time you need a screenshot, only once to configure your PC. Here’s how you set up your PC to take Android screenshots.

First, if you still have the Android SDK developer kit setup screen up (if you don’t just run the SDK Setup in the folder you extracted the files to), then click “Update All.” However, if you get the error that tells you to do a force download, then just click on the Settings option in the menu.


All you have to do is make sure that the “Force https://…” is selected under the “Misc” section. Click “Save & Apply” and then go back to the Installed Packages screen. Click on the “Update All” button.

Then just click on “Install Accepted,” and wait a while for the app to install all of the packages. It’s a good idea to just install all of them for compatibility. When this is done, go to the “Available Packages” screen and click on “Refresh.”

Now that you’ve updated the Android SDK developers kit, you’re ready to start taking screenshots of your Android device. However, I have one more step that will save you a lot of annoyance later. Create a link to the Dalvik Debug Monitor in the SDK developer kit that you can quickly use to capture screenshots. Just go to the Tools folder in the folder where you downloaded the SDK developer kit. Find the DDMS.BAT file there, and create a shortcut to it that you can place on your desktop whenever you want to take a screenshot.

Please Note: I ran into two significant issues when doing this setup on my 64 bit Vista installation. Running DDMS.BAT may return a few errors. You may need to manually enter the PATH in my system environment variables for the bin folder of your Java installation. You may also need to manually enter the ANDROID_SWT variable for the path to the swt.jar file in your Android SDK installation. You may not need to do either of these things – just pay attention to any errors the DDMS.bat file returns.

Now that you’ve configured your PC above once, taking screenshots of your Android from now on is fast and easy. The first thing you’ll want to do when you’re ready to start taking screenshots is to enable USB debugging on your phone. You can do this by going to Settings ->Applications->Development and click to enable “USB Debugging.”


Once that’s done, go ahead and plug your mobile phone into the USB port. Since you’ve already installed the driver for your device, your computer will identify and connect – if it doesn’t then just browse to directly where you downloaded the driver files (again, you’ll only have to do this once.)
Then, from now on all you need to do to take screenshots is as follows:

1. Run the DDMS.BAT file, and the Dalvik Debug Monitor will launch.


droid61 How To Capture Screenshots With Your Android Mobile Phone

You’ll see your device displayed in the left top pane. All of your phone activity is logged below and you’ll see the activity scrolling up the pane.

2. To take your screenshot, just click Device and then Screen Capture…


3. Just save your screenshot!


The screenshot is very high quality (and of course it’s huge, so you’ll need to resize it to use on your blog), and you can just click “Refresh” to get a new screenshot again. Once you’re set up to capture screenshots in this way, you’ll be able to start capturing some of the most amazing screenshots of your Android mobile device in three simple steps – launch DDMS.BAT, click Capture Screenshot on the debug monitor, and save the picture to your hard drive.
While it’s true that the initial setup on your PC can turn into a little bit of work depending on your PC configuration and operating system, it honestly doesn’t take a rocket scientist, and the highly detailed screenshots you can capture make it well worth it.
Do you take screenshots on your Android Mobile and if so, what approach do you take? Do you open root access to screenshot apps or do you prefer using the Debug Monitor approach? Share your own opinion in the comments section below!

Downlaod Youtube Video with your OPERA MINI


The great website http://en.savefrom.net/ do the job. First you must have a Opera Mini then have a internet connection, even if its legit or not, as long you have working internet connection it works fine..

1. Open Opera Mini


2. In the Enter Address, type www.youtube.com


3. The page will loading then Search any videos you want to d0wnload, in my case, I just open the Megan Young - Miss World 2013 Top Model


4. The video will not be load, because opera mini is not supported by flash player, then in the Enter Address you will see the url, Just edit it and add 'ss' before youtube.com
Sample is as below:
ssyoutube.com/watch?v=walnUot2sU8


5> en.savefrom.net will automatically find the links from www.youtube.com, then just pick the pixel you want to d0wnload, the higher the pixel the greater quality, in my case, I just click 360p


6> Then pick where you want to save, then download... "


Enjoy... !! :) :)

Monday, February 10, 2014

FG To Invest N1.3trn In University Education – Wike


The Federal Government will invest N1.3 trillion in university education over the next six years.


This has been made known by the Supervising Minister of Education Chief Nyesom Wike on Monday when a team from the World Bank and the African Centres of Excellence (ACE) paid him a courtesy call in Abuja.

This announcement has followed the statement made by the Academic Staff Union of Universities (ASUU) on Sunday that they might embark on another strike as the FG was yet to release the N220 billion to the Union.

According to Wike, the FG has realised the potential of an effective university system and therefore is determined to invest heavily in research, infrastructure, and improvement of quality teaching in the university system.

He said that the allocation of 10 slots out of 18 ACEs to Nigeria by the World Bank was a proof that such investment was beginning to yield dividends.

The Minister told the World Bank that the $80 million grant to the ACEs would be judiciously applied to achieve the goals for which the centres were established.
He commended the leadership of the National Universities Commission (NUC) for achieving such a feat.

Wike also said that it was the duty of Nigerians to ensure that they played their own part by contributing to the development of the sector.
READ MORE: http://osasinfo.blogspot.com


ASUU May Embark On Another Strike


Another strike by members of the Academic Staff Union of Universities (ASUU) is imminent as there is fear over the implementation of the Memorandum of Understanding reached with the federal government.


Indications emerged as the national treasurer of ASUU, Dr Tunde Aremu, while speaking at a luncheon held in honour of media for their roles in the last strike in Ibadan yesterday, disclosed that government was yet to release the N220 billion for 2014-2018 programmes.

He warned that the gates of the universities might again be shut should government refuse to implement the MoU reached at the tail-end of the last strike.

Aremu explained that the money was to be released on quarterly basis and deposited at the Central Bank of Nigeria (CBN). However, he expressed fears that the MoU reached with the government before the last strike was called off might end up not being implemented as agreed.

Wondering why the government let the last strike continue for 5 months, he said that they don't want another strike to be launched.

While commending the media, Aremu said that the emancipation of Nigeria depends on the media and urged them not to rest in their oars.

He said the struggle for the implementation of the 2009 agreement had been partially won and called on the media to beam their searchlights on the universities on how the money would be spent.

Meanwhile the chairman University of Ibadan chapter of ASUU, Dr Olusegun Ajiboye, said the union had no option than to proceed on the inevitable strike since all avenues to let government realize the need to implement the agreement had failed.

Ajiboye lamented that the government didn't manage to use the resources at its disposal to effectively fund the educational system of the country.

READ MORE: http://osasinfo.blogspot.com

Sunday, February 2, 2014

GOOD ANTIVIRUS FOR ANDROID


Note: to download any of the software click on link (i.e the software you want to download e.g Avast! Android Antivirus) after it load look at the top right corner of your browser and click skip advert (if u don't see skip advert just wait for it to count first)


Android Antivirus application will make your Android device free of Virus and Malware and thus will take care of your Security and Privacy. Hackers are now moved to smartphone as Computer users are aware of Malwaare and viruses but Android users are still in the dark. Many android users think that their Mobile is secure but its not true. Some statistics show that More than 1 Million android users are already infected by Various malware during last 6 months. Android’s increasing popularity is the cause of increased security threats targetting android. Common malware to advanced Phishing and ID theft techniques are some of the methods of these attacks. In order to help Android users to deal with these issues many security software companies have launched their own security apps and many of them are free to use. So don’t need to pay bucks for your Phone’s security.

Avast! Android Antivirus:
Features:

avast! Mobile Security keeps you safe from malware and malicious apps by its Antivirus Protection. Monitor your security status: The homescreen widget gives you easy access and instant protection status. Add a firewall to block hackers: If your phone is rooted, you can add a firewall to ensure that hackers stay out of your phone.
Warns you of infected websites: Web Shield warns you if your browser tries to load any malware-infected URLs. Auto-correct for mistyped URLs: If enabled, Site Correct helps prevent the troubles of mistyped URLs.

Avast! Android Antivirus

Virus Fighter! Android Antivirus:
Features:

Updated regularly as new threats come out
On-demand scanning, which helps preserve battery life (optional on-access scanning coming shortly)
On-Install scanning, to scan the latest installed applications before you use them to make sure they are safe
Fast scanning technology
Scheduled updates , Scheduled scanning
Helps IT departments keep their networks safe
Virus Fighter! Android Antivirus

Bitdefender Android Antivirus:
Features:

Bitdefender Antivirus Free uses the same scanning engines as Bitdefender Mobile Security -flagship application that has been independently certified to catch more than 99% of all viruses targeted at Android devices. Instead of downloading and storing virus signatures directly to Android devices, Bitdefender Antivirus Free uses in-the-cloud services to check online for the latest safeguards to outbreaks. Thanks to its cloud-based threat detection and top-of-the-line security services, Bitdefender Antivirus Free for Android prevents installation of malicious applications with virtually no battery life impact. Bitdefender Antivirus Free ensures Android device stay clean by automatically scanning any application immediately after its install. This also helps users stay informed and protected whenever they try a new application. On-demand scans may be run at any time, to make sure that all the applications that are installed and kept in the device’s storage are legitimate and safe.
Bitdefender Antivirus Free offers you essential antivirus protection against all Android threats. It is ready to go right after installation, acting as an effective guardian against mobile malware. Moreover, the Autopilot automatically scans any new apps you install.
Bitdefender Android Antivirus

AVG Android Antivirus:
Features:

App Scanner Scans apps to help ensure that malware will not infect your device. Run scans manually or set up automatic daily or weekly scans easily.
File Scanner Scans for malware, spyware, viruses and removes them with a simple click. Protects your device while you’re using your favorite apps, helping you keep your contacts, bookmarks, text messages, music and videos safe. Choose between manual scans or automatic daily or weekly scans.
Settings Scanner Optimizes your security settings in order to maximize your phone’s protection.
Safe Web Surfing Actively checks web addresses in real time with AVG LinkScanner® to help direct you away from a website deemed suspicious. This feature also protects you every time you enter a website address directly into your mobile device’s browser.
Phone Locator Helps you locate your phone online through Google Maps.
Task Killer is an easy-to-use feature that enables users to shut down apps to free-up RAM, thereby helping to revent frustrating slowdowns and freezes.
Call & Text Message Blocker – not only warns you of suspicious text messages, but also enables you to filter and
block unwanted calls and messages.
Monitor your data plan usage, as well as battery and app storage consumption, to help optimize the performance of your device resources.
AVG Android Antivirus

Lookout Antivirus:
Features:

Stay safe from viruses, malware, and spyware when downloading apps or files. Make sure each file, app or email
attachment you open, even on your SD card, is safe.
Scan all click-to-call links to stay safe from dialer-related threats that can wipe your data, photos or factory
reset your phone.
Surf the mobile web safely and ensure every site you visit and every link you click on from emails, texts, even
Facebook, is safe.
Privacy Advisor protects your privacy and knows which apps can access your private information.
Lookout Antivirus For Android

Sophos Security Android Antivirus:
Features:

Sophos Mobile Security is a lightweight app which protects your Android device without reducing performance or battery life. Using up-to-the-minute intelligence from SophosLabs, we automatically scan apps as you install them. This anti-virus functionality helps you to avoid undesirable software which can lead to data loss and unexpected costs. We also protect your device from attacks via USSD or other special codes. And if your device is lost or stolen, a remote lock or wipe will shield your personal information from prying eyes.
Sophos Security Android Antivirus

Kaspersky Mobile Security Android Antivirus:
Features:

Kaspersky Mobile Security uses the latest protection technologies. KMS is optimised for Android smartphones and help you to protect your private data.You can d0wnl0ad security features free of charge. But for enhanced security you have to buy this product that delivers real-time protection and also helps to keep you safe on the Internet.
NOT REALTIME PROTECTION
Kaspersky Mobile Security Android Antivirus

Comodo Android Antivirus:
Features:

COMODO Mobile Security provides real-time protection against known and emerging threats on your mobile device while helping to protect your privacy and keep your system optimized.
CMS combines a mobile-optimized antivirus scanner with a mobile security manager to safeguard you against viruses, unsafe apps and potentially risky settings. You can filter out annoying calls and text messages by configuring white and black contact lists or simply block messages by certain keywords. CMS also gives you "Private Space" - private calls, text messages and contacts that are for your eyes only.
Anti-theft protection allows you to remotely locate, lock, take photograph of the possessor or wipe off your personal data and files if the device is mislaid or stolen.
"Always on" virus protection and an on-demand scanner help keep your device clear of viruses and unsafe apps.
One touch scans and scheduled scans are provided as well as a system “Health Check” feature that quickly identifies viruses, unsafe apps and potentially risky settings.
COMODO Mobile Security

Zoner AntiVirus® :
Features:

Theft Protection (find and control your missing device)
Installed app protection
On-access and on-demand scan
Phone filtering (block calls and messages)
Parental lock for calls
Permission viewer
Task Manager
Automatic and manual database updates
Home screen widget
Secure messages

Zonner Antivirus

